If you’ve ever wanted to try your hand at drawing, there’s no better subject to start with than a Persian cat. With their luxurious coat and distinctive features, Persian cats make for an intriguing and challenging artistic endeavor. In this article, we’ll take you through a step-by-step guide on how to draw a Persian cat. From capturing their round and expressive eyes to recreating the intricate patterns of their fur, you’ll learn the techniques and tips to create a stunning and lifelike portrayal of these majestic felines. So grab your sketchbook and pencils, and let’s bring these adorable creatures to life on paper!
Materials Needed
To begin drawing a Persian cat, you will need a few basic materials. These include paper, a pencil, an eraser, drawing pens or markers, and a reference image of a Persian cat. It’s important to have these materials ready before starting your drawing to ensure a smooth and enjoyable experience.
Basic Sketch
To start drawing a Persian cat, begin by creating a basic sketch. Start with an oval shape for the head, as it serves as the foundation for the cat’s facial features. Next, add two small circles for the ears, positioning them on top of the head. Drawing guidelines for the facial features will help in shaping the cat’s face accurately. Once the head is complete, you can move on to sketching the body shape, ensuring it complements the head’s proportions.

This image is property of helloartsy.com.
Face Details
After completing the basic sketch, it’s time to add the details to the cat’s face. Begin by drawing the eyes, paying attention to their shape and size as they are one of the defining features of a Persian cat. Next, add the nose and mouth, carefully positioning them on the face. Sketch the eyebrows and whiskers to enhance the cat’s expressions and characteristics. As Persian cats have distinct face shapes, define the shape of the face according to your reference image. Finally, add fluffy fur details around the face to capture the cat’s soft and fluffy appearance.
Body and Limbs
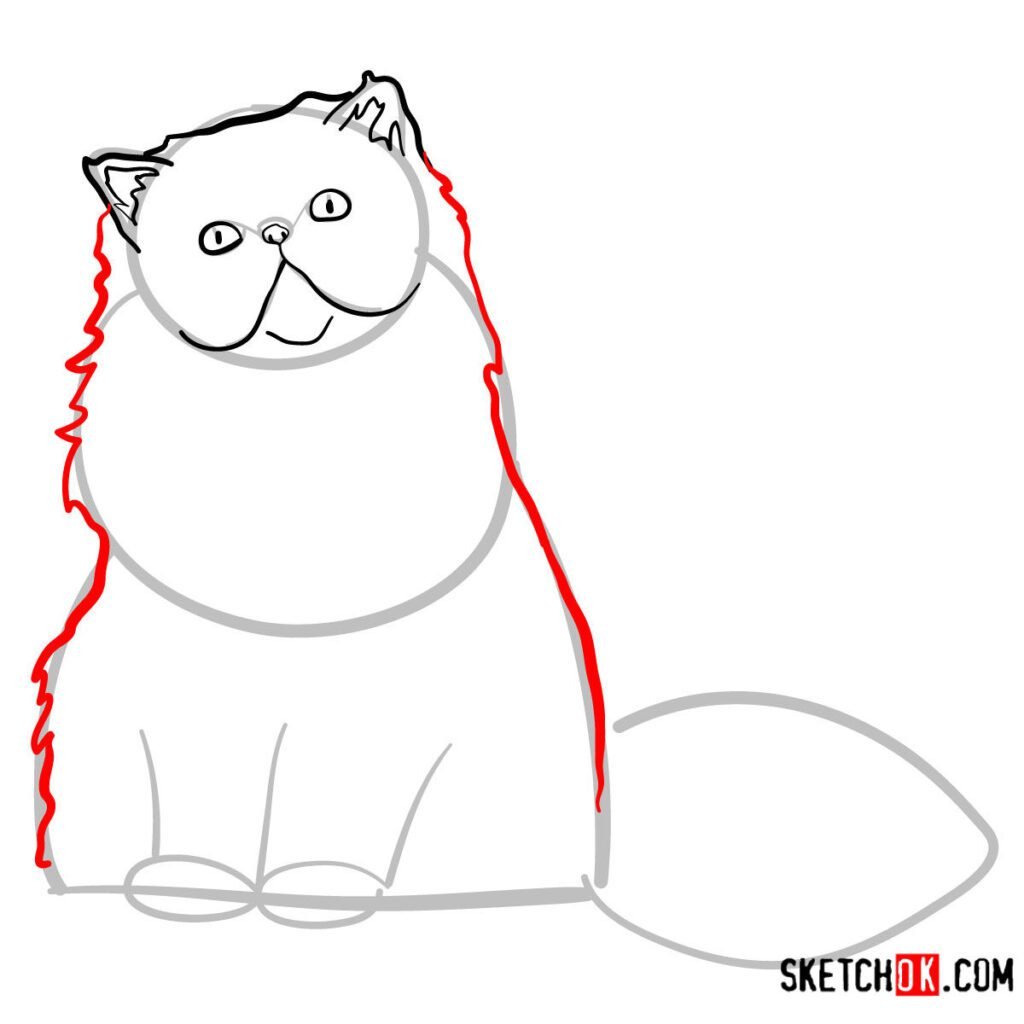
Once you’ve finished detailing the face, it’s time to focus on the body and limbs of the Persian cat. Define the body shape and size, ensuring it is proportionate to the cat’s head. Sketch the front and back legs, taking care to place them in a natural position. Add paws and claws to give the cat a touch of realism. Pay attention to the cat’s tail, as Persian cats typically have long, flowing fur. Capture the texture of the fur by adding long fur details to the tail.

This image is property of sketchok.com.
Fur Texture
To bring your Persian cat drawing to life, it’s essential to add texture to its luxurious fur. Use short strokes to add fur details throughout the cat’s body, layering them to create depth and dimension. Vary your shading to add a realistic touch, using lighter strokes for areas with more light and darker strokes for shadows. Emphasize the cat’s fluffy nature by adding extra detailing and volume to the fur around the body and face.
Refining the Drawing
Once you’ve completed the initial sketch and added all the necessary details, it’s time to refine your drawing. Start by erasing any unnecessary guidelines, ensuring that only the essential elements are visible. Clean up any messy lines by going over them with a finer pencil or a drawing pen. Add final details such as subtle facial expressions and fur patterns, giving your drawing a unique and personalized touch. Take this opportunity to enhance the overall look of the drawing, making any necessary adjustments to achieve the desired outcome.

This image is property of helloartsy.com.
Coloring
Now that you have perfected the line drawing, it’s time to bring color to your Persian cat. Choose the desired colors for different parts of the cat’s body, taking inspiration from your reference image or using your creative imagination. Begin by coloring the base coat, using light strokes to blend and shade the colors to create a realistic effect. Add highlights and shadows to give depth and dimension to the fur, making it visually appealing and lifelike.
Background
To complete your Persian cat drawing, consider adding a suitable background. Decide on the setting that complements the cat’s personality and aesthetics. It could be a simple background like a blank space, or you can add elements like a cushion or flowers to enhance the composition. Choose colors or shading techniques that harmonize with the cat’s colors and add depth to the overall artwork.

This image is property of sketchok.com.
Adding Final Touches
Once you’ve completed the main elements of your drawing, take a moment to evaluate it and make any necessary adjustments. Look for any areas that can be improved or refined further. Once you’re satisfied with your drawing, sign your artwork to personalize and claim ownership of it. If desired, apply fixative to protect your drawing and prevent smudging or fading.
Practice and Experiment
Drawing a Persian cat is an opportunity to practice and enhance your artistic skills. Don’t be discouraged if your first attempt doesn’t turn out exactly as planned. Keep practicing and experimenting with different poses, angles, and art mediums. Each attempt will help you improve your technique and gain a deeper understanding of drawing Persian cats. Enjoy the process, have fun, and let your creativity flourish. With practice, you’ll be able to create beautiful Persian cat drawings that you can be proud of.

This image is property of i.pinimg.com.